Troubleshooting NAT Failure on Speco Blue Recorder
If logging in remotely to the recorder is unsuccessful, it could be because of NAT failure. Here are some things to troubleshoot.
Make Sure NAT is Enabled
- Click the Hamburger menu ☰ icon in the top-right corner and select the option for Settings.
- This will open the settings menu
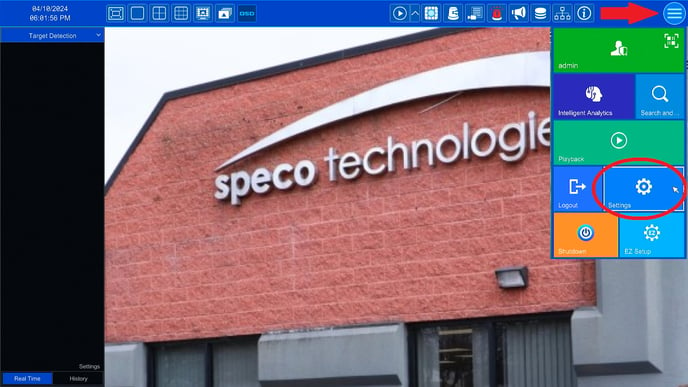
- From the Settings menu, click the option for Network towards the middle right of the menu.
- This will open the Network Settings page of the recorder.

-
- On the top gray bar, click on NAT
- On this page, make sure the Enable box is checked off
- Make sure the Access Type is set to NAT 2.0
- If only NAT 1.0 is available, the firmware may need to be updated.
- Make sure NAT Status is Successful
- On the top gray bar, click on NAT

- Verify that your Recorder's Firmware is Up-to-Date
- Click here to find the firmware version of the recorder
- Click here to see if the firmware version is up-to-date

-
Verify that the recorder has a proper IP address
- Click the Hamburger menu ☰ icon in the top-right corner and select the option for Settings.
- This will open the settings menu
- Click the Hamburger menu ☰ icon in the top-right corner and select the option for Settings.
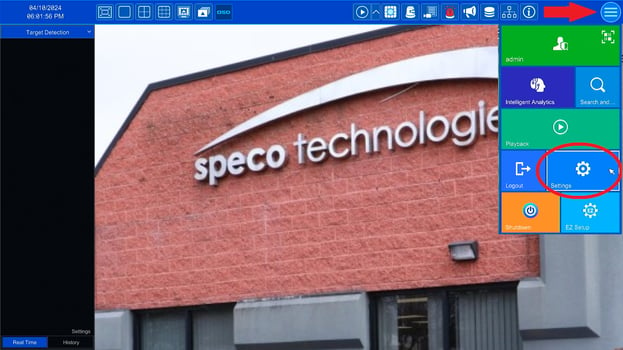
- From the Settings menu, click the option for Network towards the middle right of the menu.
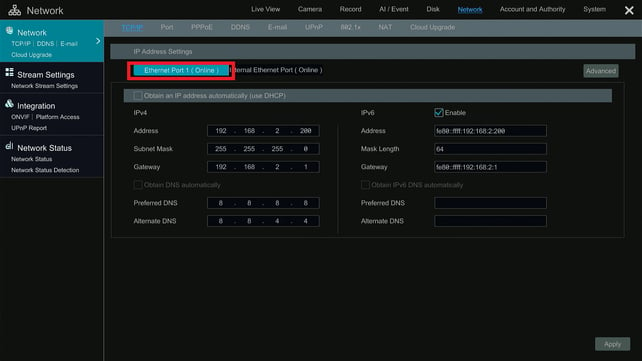
- This will open the Network Settings page of the recorder.

- Under the TCP/IP settings, verify Ethernet Port 1 reads (Online).
- If it reads (Offline) the recorder may be:
- Not plugged into a router/switch
- The cable may be bad and not functioning
- The cable may not be plugged into the LAN port of the recorder
- If it reads (Offline) the recorder may be:
-
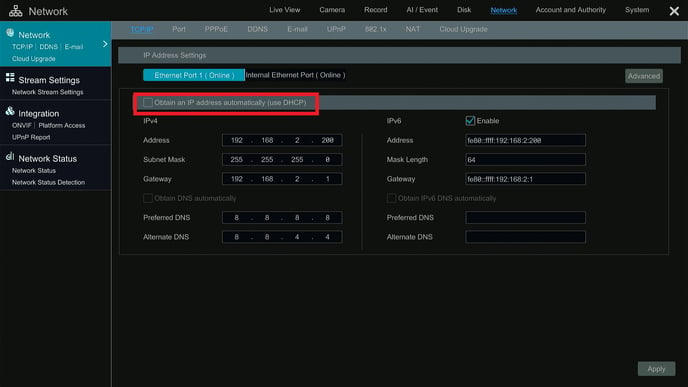
- Click the checkbox titled Obtain an IP Address automatically (Use DHCP) to enable DHCP.
- Select the checkbox titled Obtain DNS automatically to allow the network to assign a DNS address.
- Once done, select Apply.
- Select the checkbox titled Obtain DNS automatically to allow the network to assign a DNS address.
- Click the checkbox titled Obtain an IP Address automatically (Use DHCP) to enable DHCP.
-
- Then check NAT status for change
- Restart NAT
WARNING: Do not do this if you are remotely connected to your recorder as you will be logged out and not able to get back in until NAT is enabled again locally at your recorder.
-
- Uncheck the NAT Enable box, and click Apply
- Check the NAT Enable box, and click Apply
- Check NAT Status for change

-
Restart the Recorder
- Power cycle the machine
- Check NAT Status for change
-
Additional Steps:
- Verify that your recorder is properly connected to internet access
- Check with your office IT Department or Internet Service Provider (ISP) to verify that the network is functioning properly and that a firewall is not blocking remote traffic
- Verify that an Independent Firewall is not blocking remote traffic
- Check to see if there have been any recent changes to your company network
- Often when there is a NAT Status failure, it leads to an underlying network configuration or network traffic problem
Initial submission Date: August 13, 2024
Article Authored by: Christopher Cataldo
