
Step 1:
- Click the Hamburger menu ☰ icon in the top-right corner and select the option for Settings.
- This will open the settings menu

Step 2:
- Click on More under AI Event
- On the top bar, click on Temperature Detection
- Next, check the Enable box and click Apply

Step 3:
To set up a thermography rule, follow these steps:
- Select Rule Type: Choose from the following options:
- Point: For measuring the temperature of a specific point.
- Line: For measuring temperature along a line (useful for detecting temperature variations).
- Area: For assessing the temperature over a larger area.
- Set Emissivity:
- Determine the emissivity value for the target material. Common emissivity values are:
- 0.95 for human skin
- 0.85 for painted surfaces
- 0.80 for asphalt
- Adjust based on the specific material you are measuring.
- Determine the emissivity value for the target material. Common emissivity values are:
- Distance
- Measure the distance between the target object and the thermographic camera. This is important for accurate temperature readings.
- Reflected Temperature
-
- Identify any nearby objects with high emissivity that may affect readings.
- Set the reflected temperature to account for ambient influences. This will help correct the temperature readings for more accurate results.
- Once you have configured these parameters, you can begin capturing and analyzing thermal images

- Set Reflective Temperature
- Ensure that the reflective temperature is set to match the temperature of the identified high-emissivity object. This helps in correcting the measurements accurately.
-
- Select Alarm Rule:
-
- Choose the type of alarm rule:
- Above (Average Temperature): Triggers an alarm when the average temperature exceeds a specified threshold.
- Choose the type of alarm rule:
- Set Alarm Temperature:
-
- Input the desired alarm temperature. For example:
- Alarm Temperature: 100°C
- Configure Alarm Output:
-
- Check the option to enable alarm output. This could trigger a notification, an audible alarm, or an external device based on your system's capabilities.
- Finalize Settings:
- Review the settings to ensure everything is configured correctly. Once set, the system will trigger alarms when the average temperature of the target exceeds 100°C.
Step 4:
-
To set up points, lines, or areas for thermal measurement in your thermography system, follow these steps based on your selected type:
Point Setting
- Select Point Type: Change the setting to “Point.”
- Set Points: Click on the desired location in the thermal image.
- You can set up to 10 points in the interface.
- Confirm Points: Ensure each point is clearly marked for measurement.
Line Setting
- Select Line Type: Change the setting to “Line.”
- Draw Line: Click and drag the mouse on the image to draw a line where you want to measure the temperature.
- It’s recommended to set no more than two lines simultaneously to maintain measurement accuracy.
- Confirm Lines: Ensure the lines are positioned correctly for effective monitoring.
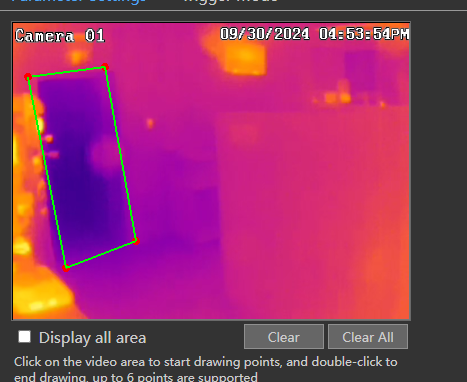
Area Setting
- Select Area Type: Change the setting to “Area.”
- Draw Area: Click around the perimeter of the desired area on the image to define a closed shape.
- Make sure the area is fully enclosed to be recognized as a valid alarm area.
- It’s advisable to set no more than two areas at the same time for accuracy.
- Confirm Area: Ensure the selected area is highlighted and correctly outlined.
Final Steps
- Review all points, lines, and areas set for any adjustments.
- Save your settings to apply them to the thermal analysis.
This setup will enable effective monitoring and alarm triggering based on your defined parameters.
Step 5:
Configure exception alarm linkage items in the thermography system, follow these steps:
- Access Trigger Mode:
- Click on the “Trigger Mode” option in your settings.
- Configure Alarm Linkage Items:
- You will see various options to enable or disable. Adjust each setting according to your requirements:
- Record: Enable to start recording when an alarm is triggered.
- Snapshot: Enable to capture a snapshot at the moment of the alarm.
- Push: Enable to send a push notification to your device.
- Alarm-out: Enable for external alarm triggers.
- Preset: Enable to move the camera to a predefined position upon an alarm.
- Buzzer: Enable to sound an audible alert when an alarm is triggered.
- Pop-up Video: Enable to display a video feed of the event.
- Pop-up Message Box: Enable to show a message on the screen when an alarm occurs.
- E-mail: Enable to send an email notification when an alarm is triggered.
- You will see various options to enable or disable. Adjust each setting according to your requirements:
- Review and Save Settings:
- After configuring your preferences, review all selected options.
- Save your settings to apply them to the system

Step 6:
To finalize your configuration, follow these steps:
- Review Your Settings: Make sure all settings, including points, lines, areas, and alarm linkage items, are correctly configured.
- Click “Apply”: Locate and click the “Apply” button to save all your settings.
- Confirmation: Look for any confirmation message indicating that your settings have been successfully saved.
Once you've applied the settings, your thermography system will be ready to monitor according to your configurations.
Initial submission Date:
Article Authored by Samantha Franco