
Table of Contents
Section 1 – Downloading SpecoScanner
Section 2 – SpecoScanner Interface.
Section 3 – Updating Passwords/IP Addresses.
Section 3.1 – Updating Passwords
Section 3.2 – Updating IP Addresses.
Section 4 – Adding a device to SecureGuard Cloud.
Section 1 – Downloading SpecoScanner
1) You will need to download the SpecoScanner software from the Speco website. Currently, it is only available for Windows.
2) You can either: Type in specotech.com/ip-scanner/ into your search bar, or
a. Go to the Speco Technologies homepage,
b. Under Support, click on Scanner,
c. Click on SecureGuard IP Scanner.
3) Click the download button. This will download the SpecoScanner zip file.
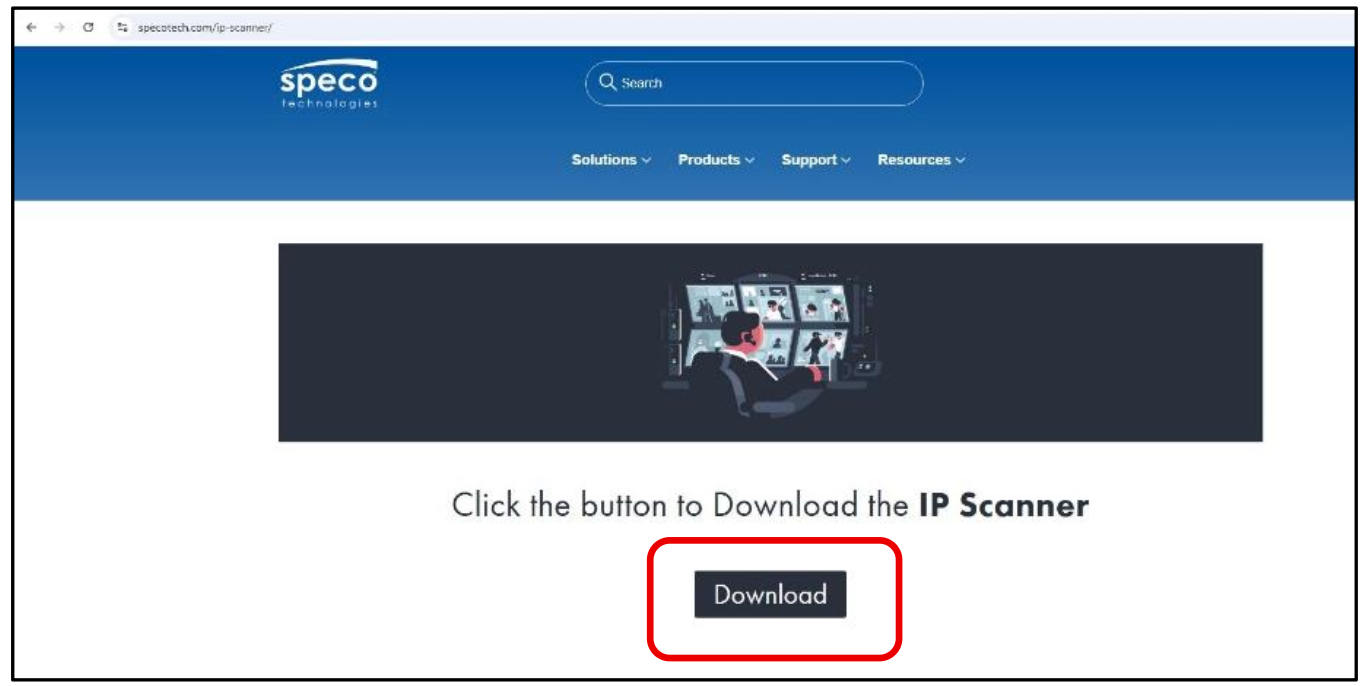
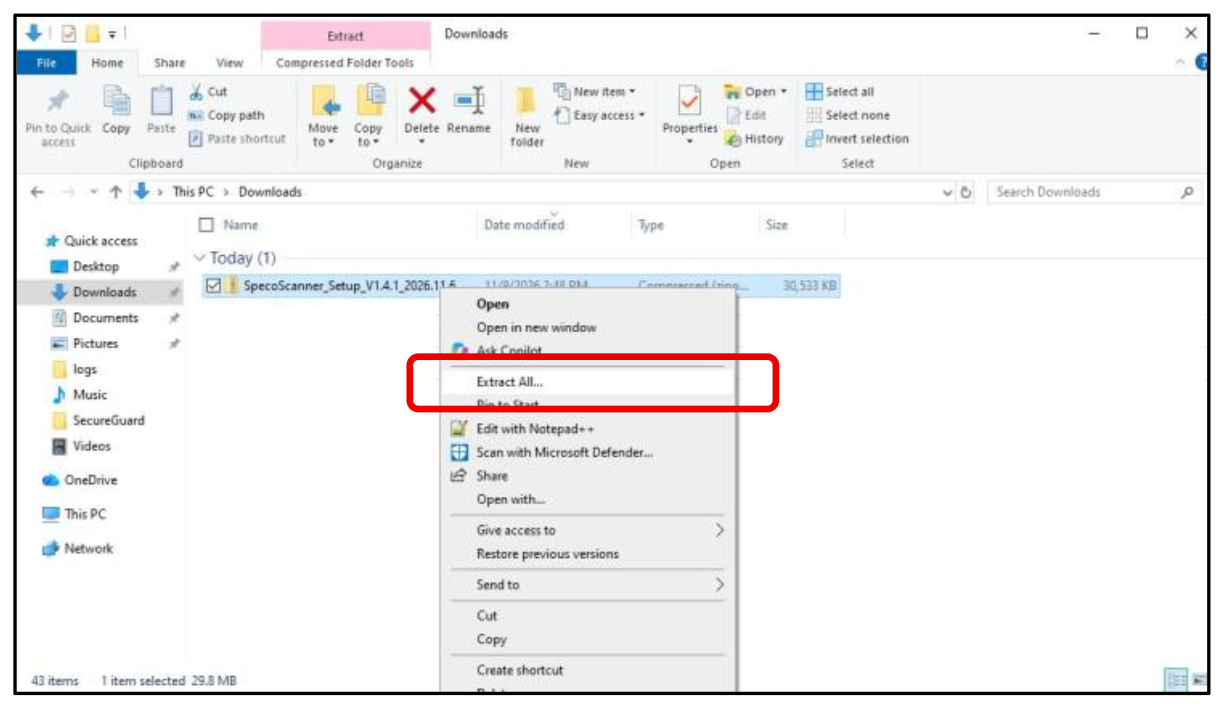
4) When it finishes downloading, extract the zip file by right-clicking on the file and clicking Extract all.
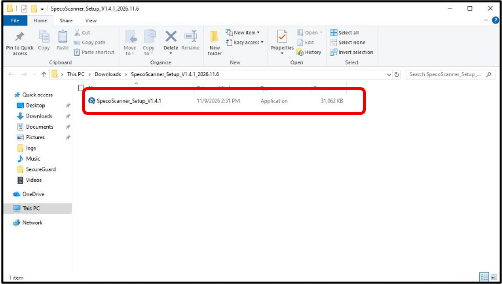
5) When the file is done extracting, the SpecoScanner Setup Application will appear. Double-click on it to start the setup process.
6) The Speco Site Locator Setup Wizard should pop up.
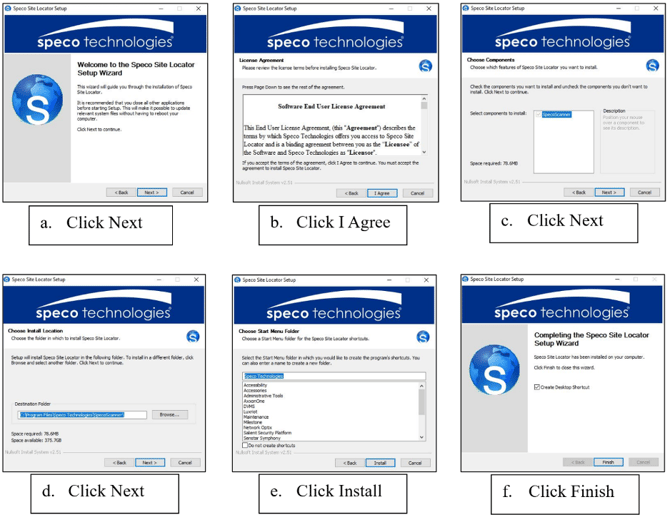
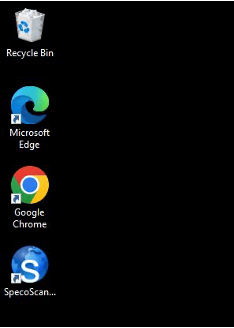
7) This should create a shortcut on your desktop for the SpecoScanner. Double-click on the icon to open it.
 Back to index
Section 2 – SpecoScanner Interface
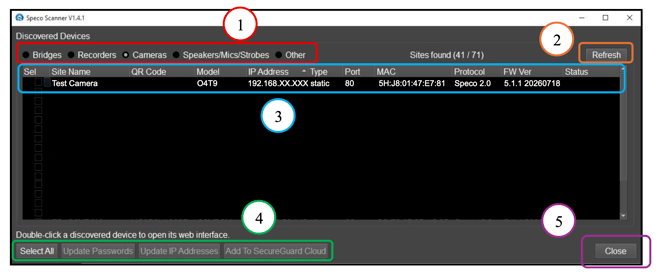
1) Types of devices – Select the type of device(s) you are trying to locate: bridge, recorder, camera, speaker/mic/strobe, or others.
2) Refresh Button – Click on it to refresh the page if your device(s) haven’t shown up yet.
3) Device information – Shows the information of the device(s)
a. Sel – Click on the box to select the device
b. Site Name – Name given to the device, can be changed
c. QR Code/Cloud ID – P2P code for the device, older firmwares will NOT have this
d. Model – Part Number/Model of the device, cannot be changed
e. IP Address – IP Address of the device
f. Type – Type of IP address, static or DHCP
g. Port – Network/web port
h. MAC – MAC Address of the device
i. Protocol – Protocol version of the device
j. FW Ver – Firmware version of the device
k. Status – Status of the update for the device
4) Action Buttons – Controls the device(s), varies based on type of device
5) Close Button – Click on it to close the application
6) You can double-click on any device to open its web interface.
a. Login with your device username and password.
b. If you didn’t set up a username or password, login in with the default username and password.
Section 3 – Updating Passwords/IP Addresses
Section 3.1 – Updating Passwords
- Select the device or devices that you want to update the password of. You can select the devices individually or click the Select All button on the bottom-left.
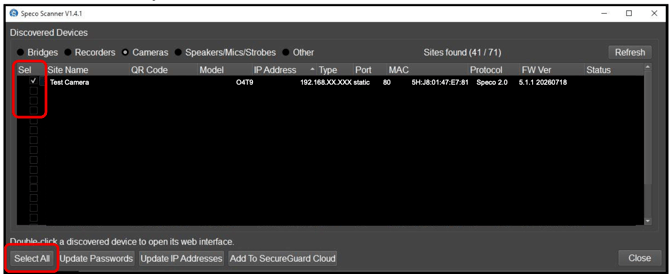
2) Click the Update Passwords button.
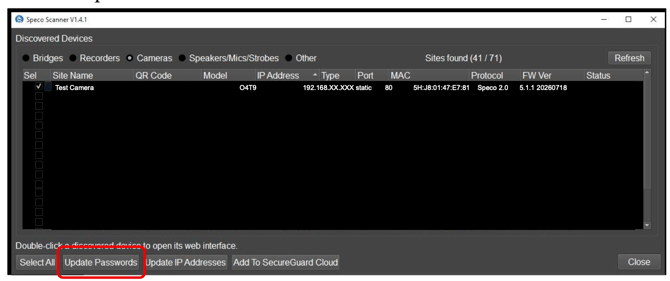
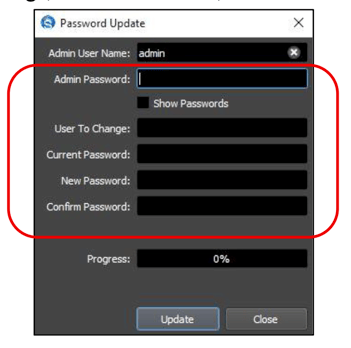
3) The Password Update window will pop up. Fill out the information, such as Admin Password, User To Change, Current Password, New Password, and Confirm Password.
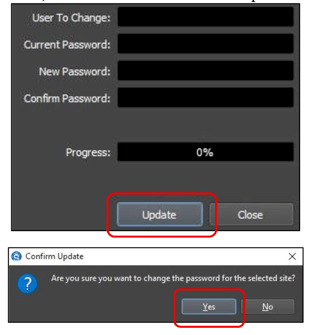
4) Click the Update button, then click Yes to confirm the update.
5) The progress bar will show when it is completed, and you will receive a confirmation that the site has been successfully updated.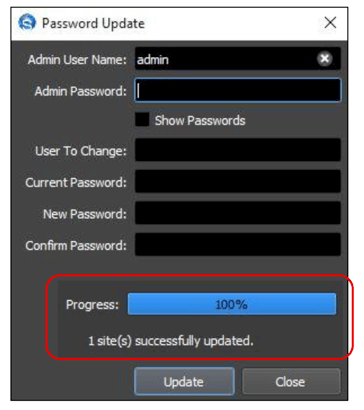
Section 3.2 – Updating IP Addresses
1) Select the device or devices that you want to update the IP address of. You can select the devices individually or click the Select All button on the bottom-left.
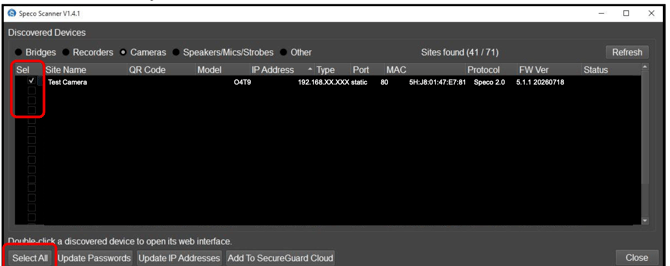
2) Click the Update IP Addresses button.
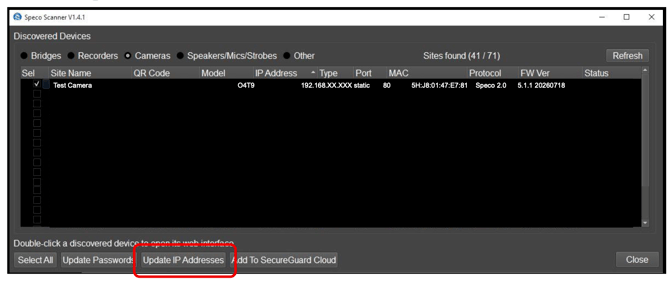
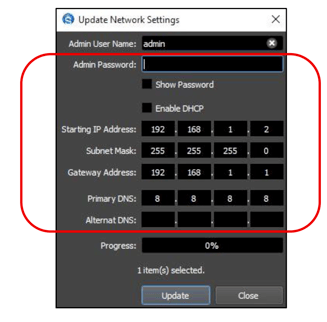
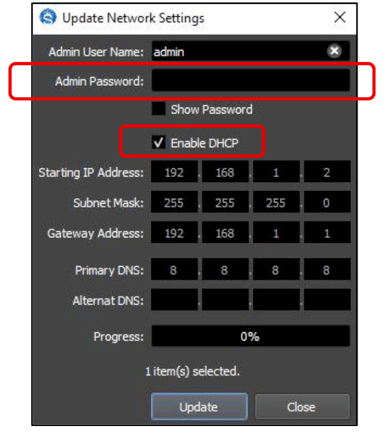
3) The Update Network Settings window will pop up. To manually change the IP address:
a. Fill out the information, such as the Admin Password, IP Address, Gateway Address, and Alternate DNS.
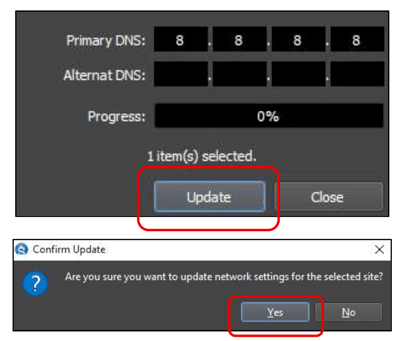
b. Click the Update button when you are done, then click Yes to confirm the update.
c. The progress bar will show when it is completed, and you will receive a confirmation that the site has been successfully updated.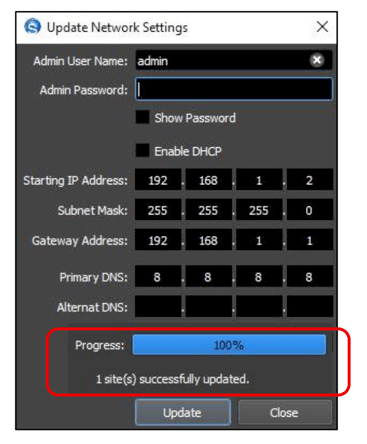
4) To change the IP address from static to DHCP:
a. Enter the Admin Password and check the box next to Enable DHCP.
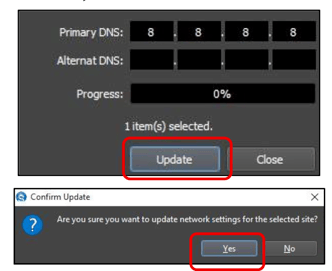
b. Click the Update button, then click Yes to confirm the update.
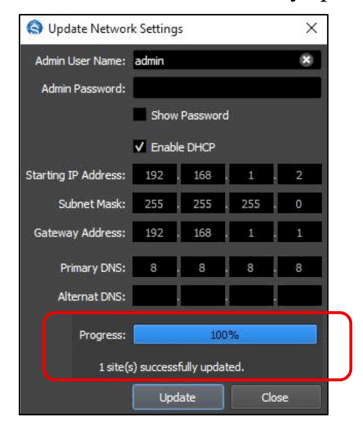
c. The progress bar will show when it is completed, and you will receive a confirmation that the site has been successfully updated.
Section 4 – Adding a device to SecureGuard Cloud
1) Select the device or devices that you want to add to SecureGuard Cloud. You can select the devices individually or click the Select All button on the bottom-left.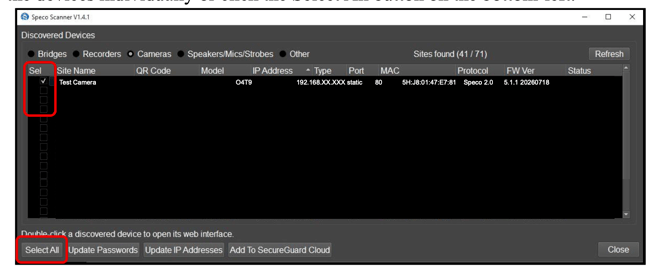
2) Click the Add to SecureGuard Cloud button.
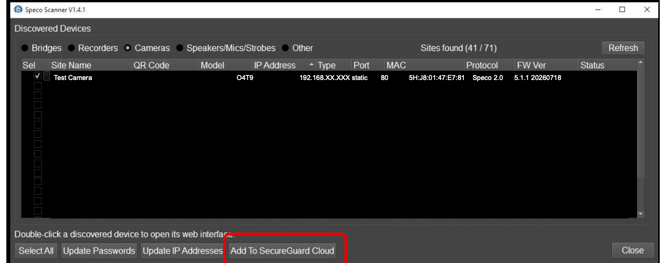
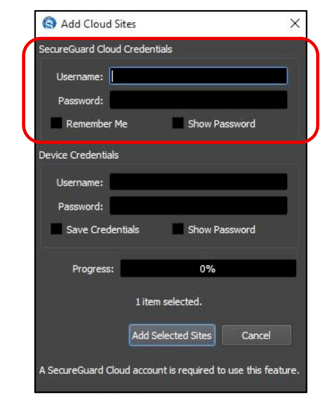
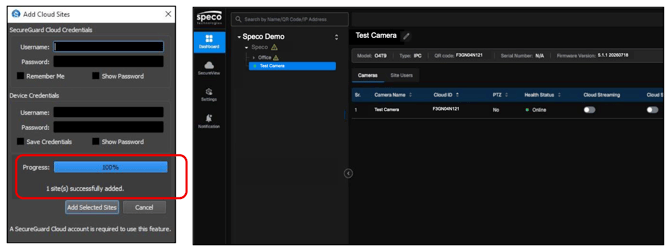
3) The Add Cloud Sites window should pop up. Enter your SecureGuard Cloud credentials at the top.
a. Note: You will need an Installer Account. This will NOT work with a Partner User Account.
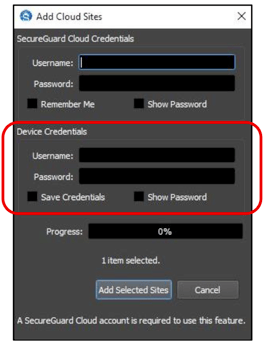
4) Next, enter the device credentials, the username and password of the device you are adding to SecureGuard Cloud.
5). Click the Add Selected Sites button, then click Yes to confirm.
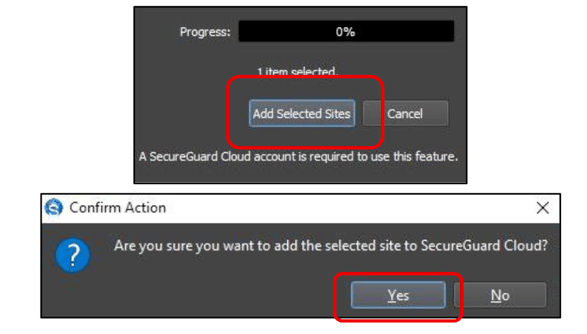
6) The progress bar will show when it is completed, and you will receive a confirmation that the site has been successfully added. You can also log into your SecureGuard Cloud account to see if the device is on your dashboard
Section 5 – Troubleshooting
|
Issues |
Possible Solutions |
|
SpecoScanner isn’t downloading or opening |
· Are you using a Windows device? SpecoScanner currently only works on Windows · Did you download the SpecoScanner from our website? Downloading it from a third-party can cause issues. · Try uninstalling/deleting the Setup Application and redownload it. |
|
Your device isn’t showing up |
· Have you tried refreshing the SpecoScanner? Some devices may take longer to appear. · Make sure that the device and the laptop/computer are on the same network. · Check the network connection of the device. |
|
The device wasn’t added to my SecureGuard Cloud |
· Do you have an Installer Account for SecureGuard Cloud? · Make sure the SecureGuard Cloud credentials are correct when adding device. · Make sure the device credentials are correct when adding device. |
If you are still experiencing issues/problems or if your issues/problems are not listed, then feel free to call us at 1-800-645-5516 or email us at techsupport@specotech.com.