
Please note: This guide is only intended as a supplement to official fire detection methods and should not be relied on as a primary alert source.
- Fire Detection: Alarms will be triggered when the camera detects a fire source through thermal imaging.
- How to configure the Fire Detection settings:
- Step 1: Log into the camera and go to Config.
- Step 2: Click on Fire Detection.
- Alarms will be triggered when the camera detects a fire source through thermal imaging.
- Step 3: Click Enable and set the fire detection sensitivity and alarm holding time.
- Fire Detection Sensitivity: A higher value makes it easier to detect a fire, but increases the chance of false alarms. Adjust the sensitivity as needed.
-
-
- Alarm Holding Time: This refers to the duration the alarm continues after the initial detection.
-
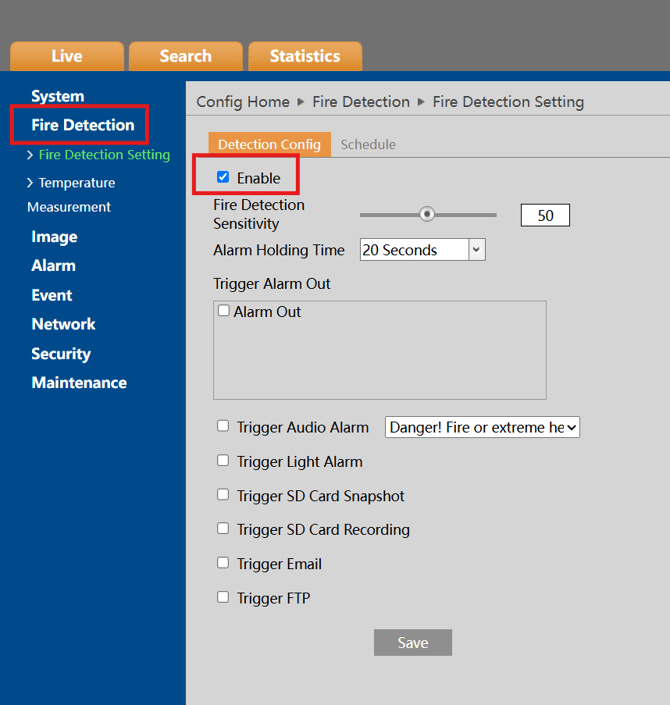
- Step 4: Set the alarm trigger options
- Alarm Out: If selected, this triggers an external relay output connected to the camera when a fire source is detected.
-
- Trigger Audio Alarm: If selected, a warning voice will sound when the fire source is detected. (Please set the warning voice first—see Audio Alarm for details.)
-
- Trigger Light Alarm: If selected, the camera's light will flash when the fire source is detected. (Please set the light flashing time and frequency first—see Light Alarm for details.)
-
- Trigger SD Card Snapshot: If selected, the system will capture images and save them on an SD card.
-
- Trigger SD Card Recording: If selected, video will be recorded on an SD card when the fire source is detected.
-
- Trigger Email: If Trigger Email and Attach Picture are checked (ensure the email address is configured in the Email settings), the captured pictures and event details will be sent to those addresses.
-
- Trigger FTP: If Trigger FTP and Attach Picture are checked, the captured pictures will be sent to the FTP server (ensure FTP settings are configured).
Step 5: Click Save to save the settings.
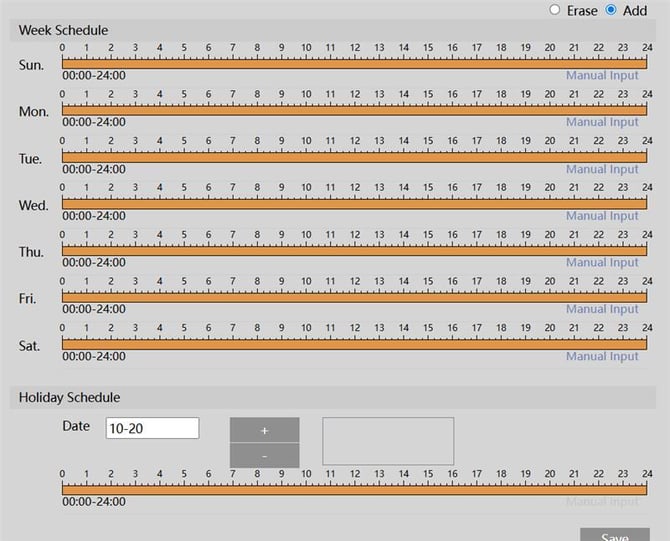
Step 6: Set the fire detection schedule. The setup steps for the schedule are the same as for Schedule Recording. (See Schedule Recording for more details.)
- Set the fire detection schedule
- A schedule can be made for any day of the week including a holiday schedule that can be configured for specific days of the year.
- If the schedule is filled in orange then the schedule is active for that timeframe, if it is gray it is inactive.
- Temperature Measurement:
- Alarms will be triggered when the temperature of the pre-defined point, line, or area exceeds the threshold value.
- Step 1: Click Config.
- Step 2: Click Fire Detection.
- Step 3: Click Temperature Measurement to access the settings interface.
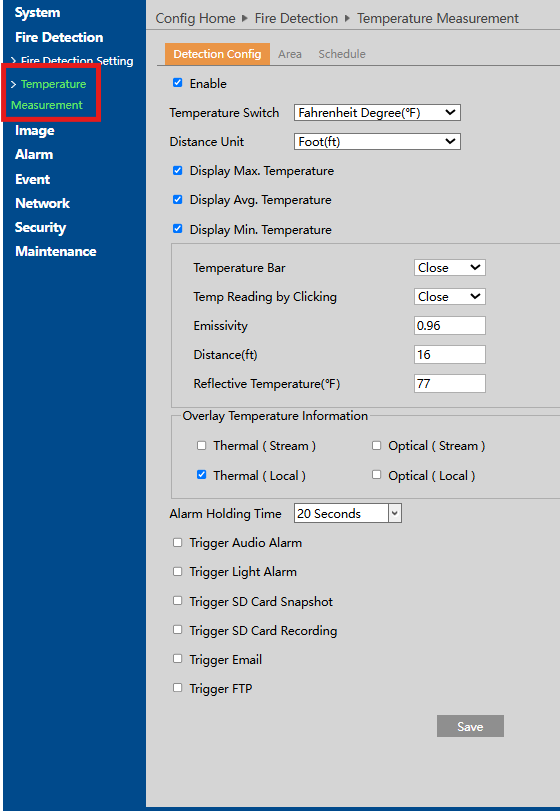
- Step 4: Click Enable and set the temperature measurement parameters.
-
-
- Temperature Switch: Select the temperature unit (°C or °F).
-
-
-
- Distance Unit: Select the unit for the temperature measurement distance (Meter or Foot).
-
-
-
- Display Max. Temperature: If checked, the maximum temperature in the set area/line will be displayed in real-time.
-
-
-
- Display Avg. Temperature: If checked, the average temperature in the set area/line will be displayed in real-time.
-
-
-
- Display Min. Temperature: If checked, the minimum temperature in the set area/line will be displayed in real-time.
-
-
-
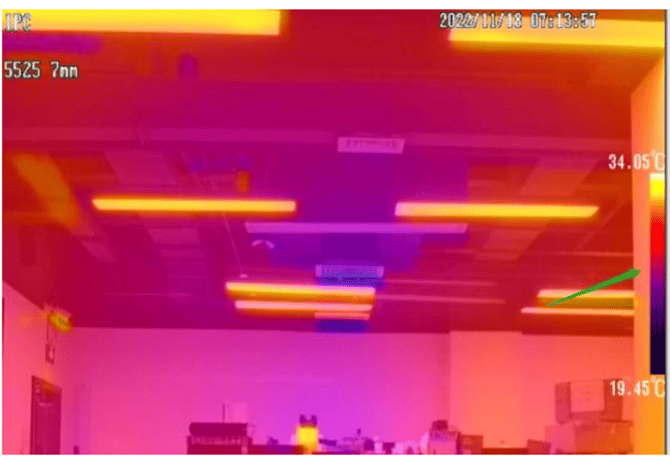
- Temperature Bar: If enabled, a color reference temperature bar will appear on the right side of the thermal image in the live view interface. The minimum and maximum temperatures will be shown at the bottom and top of the bar, respectively.
-
- Temp Reading by Clicking: If enabled, you can read the real-time temperature of any point you click on the thermal image in the live interface.
- Emissivity: Set the emissivity of the target. Emissivity varies for different materials—refer to Common Material Emissivity for more details.
- Distance: Set the distance between the target and the camera.
- Reflective: If an object with high emissivity is present in the scene, set the reflective temperature to match the temperature of the high-emissivity object.
- Overlay Temperature Information:
- Thermal/Optical (local): If enabled, the temperature information will be shown locally in the live view interface. This information will not be overlaid during playback.
- Thermal/Optical (stream): If enabled, the temperature information will be overlaid on both live and recorded video.
-
Step 5: Set the alarm holding time and alarm trigger options. The setup is the same as for Fire Detection (see Fire Detection Settings).
-
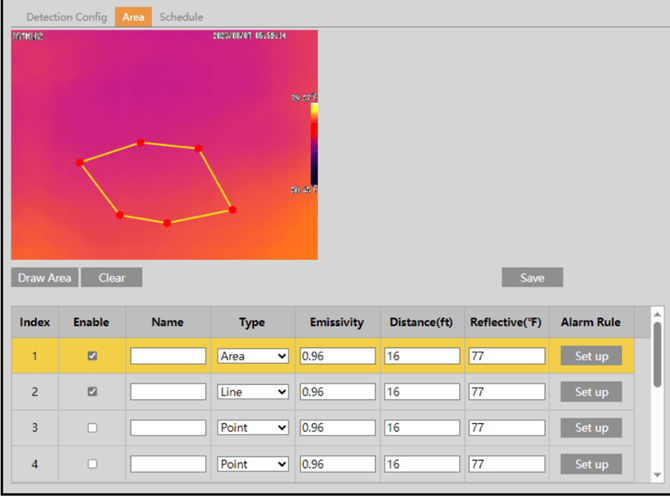
Step 6: Set the thermography rule. Click the Area tab to access the following interface.
- Point Setting: After selecting "Point," click Draw Area and drag the mouse to position the point. Click Stop Draw to finish. You can set up to 10 points.
- Line Setting: After selecting "Line," click Draw Area and drag the mouse to draw a line. Click Stop Draw to finish. To ensure accuracy, we recommend no more than two lines at once.
- Area Setting: Click Draw Area and click around the desired area in the image to create a closed alarm area. Click Stop Draw to finish. Use the Clear button to delete the area
-
Step 7: Click Save to save the settings.
-
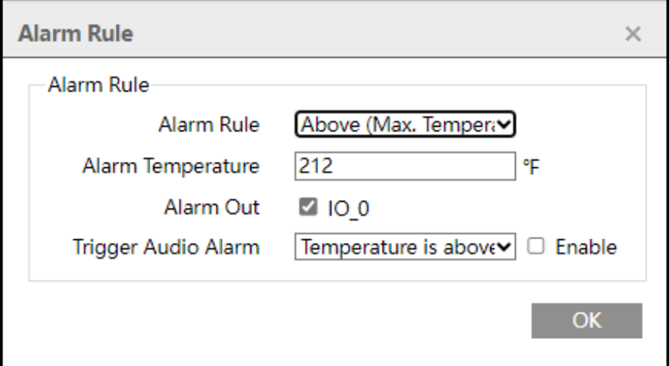
Step 8: Click Set Up to define the alarm rule. Set the alarm temperature and enable alarm output or audio alarm as needed. For example, if you select Alarm Rule: Above (Average Temperature), set the temperature threshold to 100°C and enable the alarm output. The alarm will trigger when the average temperature exceeds 100°C.
-
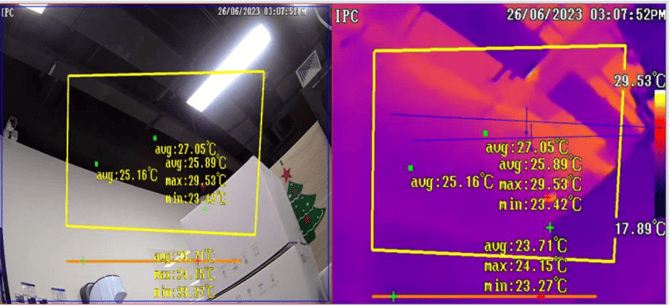
Step 9: Click Live to view the temperature and rule information.
Requirements for Fire Detection and Temperature Measurement:
- The thermal camera should be used in a stable, indoor environment without wind. Ensure the monitoring area is free of airflow-producing objects.
- To prevent sensor damage, keep the camera lens away from direct sunlight.
- Install the thermal camera at the highest point of the detection area, ensuring it faces the detected object.
Initial submission Date: October 10, 2025

Article authored by: Speco Training Department

Article transcribed/revised on Feburary 2nd, 2026 by: Michael Pagano, Technical Support Agent - Tier 1