
*Note* - The O2DB1 camera only accepts the
ACSK2 key fob, ACSC2 smart card, and ACSM2P smart card.
The settings that need to be enabled must be done within the camera itself since these settings will not appear in a Speco Blue recorder.
Step 1:
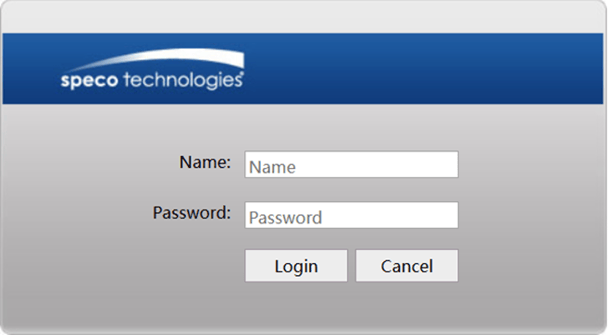
- Open a web browser
- Type in the IP address of the camera into the web browser's address bar.
- This should present the camera's login screen.
- Please insert the camera's username and password.
Please refer to Section 2 - Web Access and Login of the camera's user manual for the default username and password.
Step 2:
- After a successful login, the Live Camera screen should be seen.
- If this is the first time the computer in use is connecting to a Speco camera, a page may load before the Live screen that asks the user to download a plugin. Please download the plugin and refresh the page once it is complete.
- Different cameras may require different plugins.
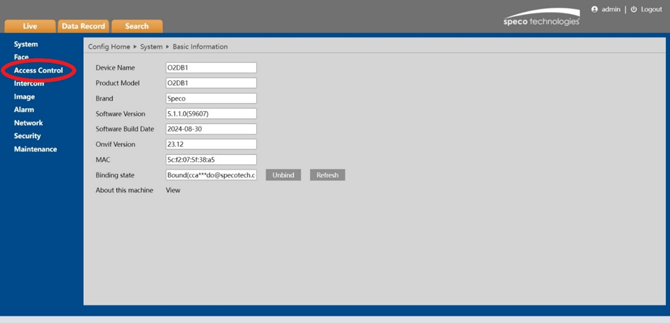
- At the top-left corner of the Live camera screen, please select the Config button
- This will open the Basic Information page from the System settings section.
- If this is the first time the computer in use is connecting to a Speco camera, a page may load before the Live screen that asks the user to download a plugin. Please download the plugin and refresh the page once it is complete.
Step 3:
- On the left-side menu, Select Access Control there all the settings involved with setting up the device to be wired to the access control panel will be.
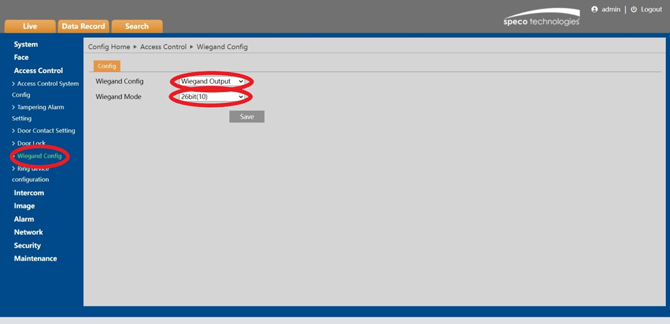
- Under Access Control click on Wiegand Config
- By default the setting Wiegand Config is turned off
- Make sure the configuration looks like this:
- Wiegand Config: Wiegand Output
- Wiegand Mode: Either 26bit (8) or 26bit (10)
- Click Save
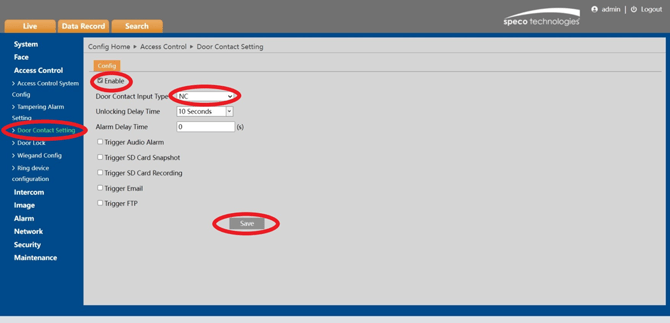
Step 4: Door Contact Setting
- Go to Access Control > Door Contact Setting
- Set Input Type for either Normal open (NO) or Normally Closed (NC)
- The Unlocking Delay Time can be set from 10 seconds to 4 minutes
- Alarm delay time can be set between 0 and 999 seconds.
- Both settings are for customer preference otherwise they can be left alone.
- Once those are set hit save
Step 5: Key Fob Configuration
- Place the fob in the center of the camera will make a chime and say “Access Granted” thus ensuring the camera can now read the fob credentials.
- We can now add the fob to the people management database
- On the menu on the left go to Face and click on People Management
- On the People Management page click on

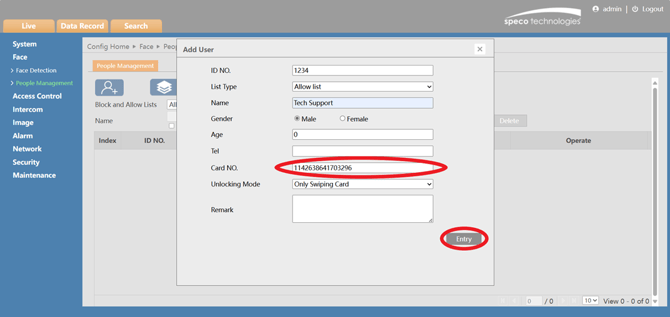
- The Add User page will come up and this is where we can add the fob to the database of the O2DB1 camera.
- Scan the ACSK2 fob that will be assigned to the user(s) that will have access to the door
- You’ll see once the fob is scanned by the O2DB1 the Card NO. will automatically fill in. ID NO. is completely customizable.
- You’ll give the User a name, you can also input the person’s age and telephone number as well.
- When that’s done you can click on Entry to add the fob to the O2DB1 camera.
Integrating the O2DB1 Camera with an A2E4P or A1 Access Control Panel
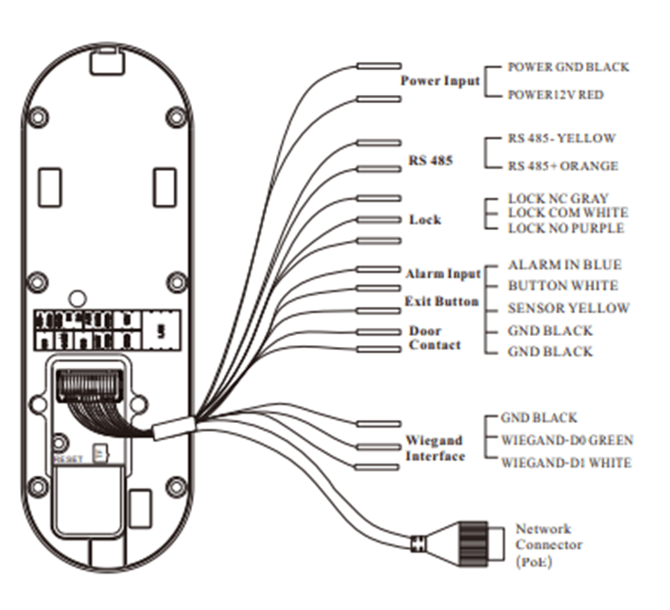
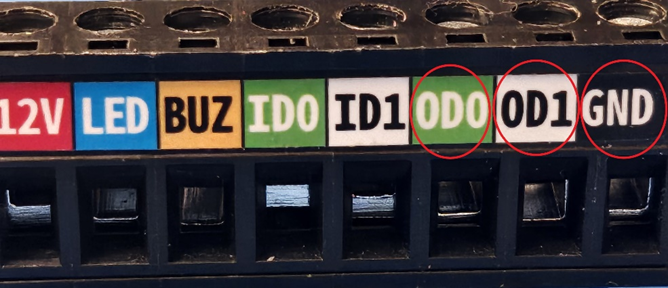
To connect the O2DB1 camera to the phoenix connector, you will need to prepare the wires designated for the Wiegand interface. Three specific wires are required for this connection: the black wire, the green wire, and the white wire. Connect the black wire to the GND terminal, the white wire to the 0D1 terminal, and the green wire to the 0D0 terminal.
- After completing the wiring, proceed to connect the phoenix connector to the access control panel. Then, open a web browser and enter the access control panel's IP address to establish a connection.
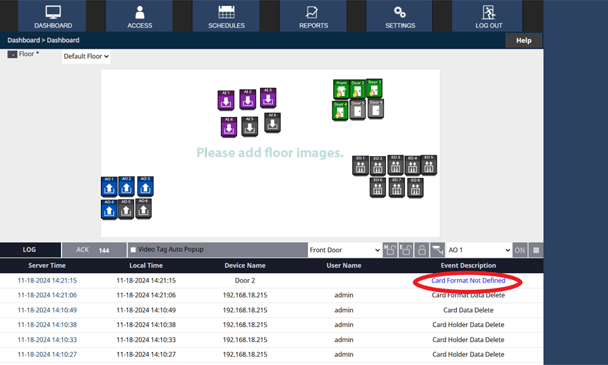
- After logging into the access control panel, you will be directed to the dashboard. To confirm that the O2DB1 camera is correctly connected to the A2E4 or A1 panel, scan the ACSK2 fob.
-
-
To verify successful communication between the panel and the O2DB1 camera, you should see the message "Card Format Not Defined" after scanning the ACSK2 fob. If there is no response from the panel when you scan the fob, double-check that the wires connected to the 0D0 and 0D1 terminals on the phoenix connector are properly secured.
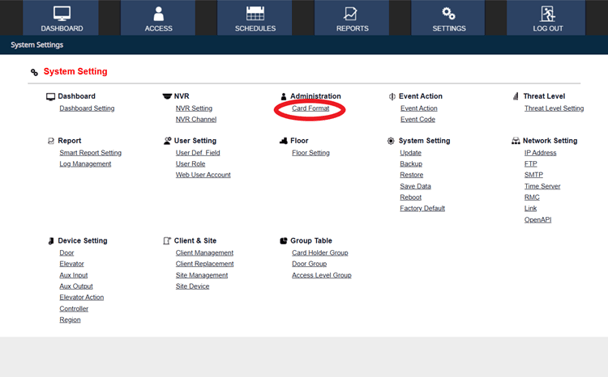
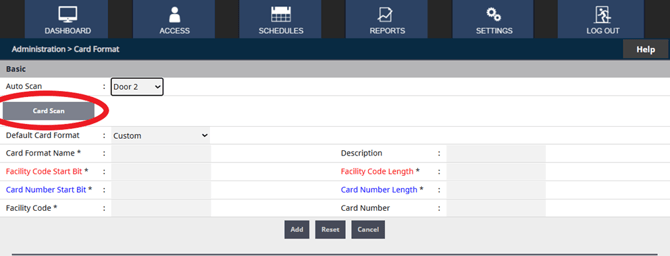
Next, navigate to the SETTINGS section from the dashboard homepage. Under the Administration menu, select Card Format Settings. Here, you will enter the fob format required for the panel to correctly recognize it.
-
- After selecting the card format, you will be redirected to the card format page. On this page, locate the decoder option at the bottom left corner. Click on the decoder option to enable the decoding of the card.
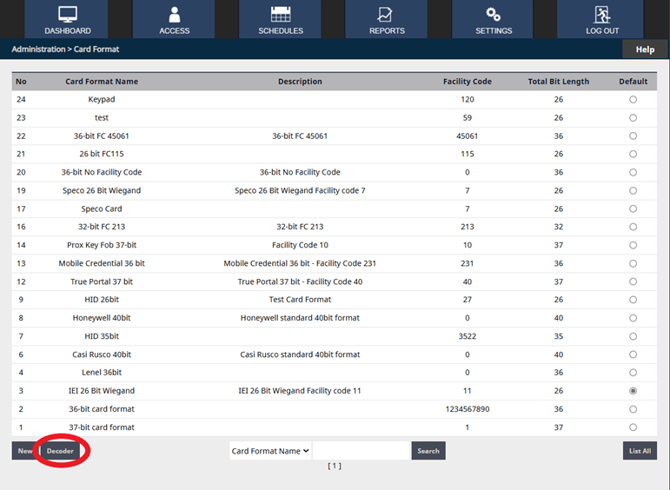
- When you click on the Decoder option, a prompt page will appear, allowing you to scan the fob to synchronize the card format with the panel. For the Autoscan feature, be sure to select the reader and door that are nearest to you before scanning the fob. Once you click on Card Scan, you will have a 30-second window to complete the fob scan.
- Upon scanning the fob, the Total 26 Bit value will be displayed, and all relevant information from the fob will be automatically populated. You can then click on "Add" to incorporate the O2DB1 card format into the access control panel.
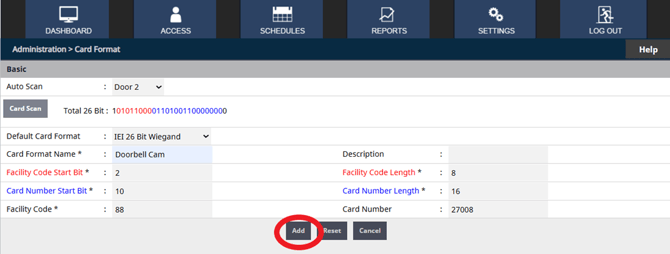
After clicking "Add," you can proceed to register additional fobs in the O2DB1 camera under the People Management section. Additionally, ensure that these fobs are assigned to the corresponding users in the access control panels.
Initial submission Date: November 22nd, 2024
Article Authored by: Jacob Brenner