
Method #1: Connecting to the camera through the recorder.
Please note this is only an option with a Speco Blue series recorder.
Please verify that the recorder unit is on a network and its IP address is known before beginning the process. Please have the computer connected to the same network as the recorder.
This will not work with a remote connection.
- First, open a web browser and type in the IP address of the recorder in the address bar.
- A Speco Login screen should appear. Please insert the recorder unit's username and password and select Login.
- If it is the computer's first time logging into the recorder, the web browser will ask for a plugin to be downloaded. Please download and run the plugin. Refresh the page once that it done.

- Once logged in successfully, the Live View screen should be visible.
- In the top left corner of the page, please select the Settings option.

- That will open the Settings page.
- Please select Edit Camera from the Camera settings section.

- This will open a page listing every camera added to the recorder unit.
- The right-most column of the camera list will be titled Settings. A gear icon should be seen for every camera in that column.
- Please select the gear icon for the camera that needs to be connected to.
- The right-most column of the camera list will be titled Settings. A gear icon should be seen for every camera in that column.

- This will open a new tab in the web browser and the Login screen for the camera should now be seen. Please insert the username and password to the camera. Select Login to proceed.

Please refer to Section 2 - Web Access and Login of the camera's user manual for the default username and password.
Method #2: Connecting directly to the camera.
*** An ethernet cable, as well as a computer with an ethernet port are required ***
- First, verify what the camera needing connecting is plugged into.
- It will either be plugged directly into the recorder unit, directly into the local network, or directly into an external switch. That external switch can then be plugged into either the recorder, or the network. Please verify the setup.
- Plug the computer with the ethernet cable into the same switch that the camera in question is plugged into.
- If the camera is plugged directly into a recorder, plug the computer into an available camera port of the recorder. If the camera is plugged directly into the local network, plug the computer into an available port on the router/modem of the local network. If the camera is plugged into an external switch, plug the computer into an available port on the external switch.
- Please verify the camera's IP address.
- This can be done by utilizing one of our Speco IP Scanner tools. Please pull up the appropriate IP Scanner tool to scan the cameras on the network.
- Please use the Speco Blue Scanner if you have Speco Blue cameras.
- CLICK HERE to be taken to its download page.
- Please user the SecureGuard IP Scanner if you do not have Speco Blue cameras.
- CLICK HERE to be taken to its download page.
- Please use the Speco Blue Scanner if you have Speco Blue cameras.
- Any cameras plugged into the switch that the computer is plugged into should appear on the IP scanner. More may appear depending on how the switch was configured.
- This can be done by utilizing one of our Speco IP Scanner tools. Please pull up the appropriate IP Scanner tool to scan the cameras on the network.
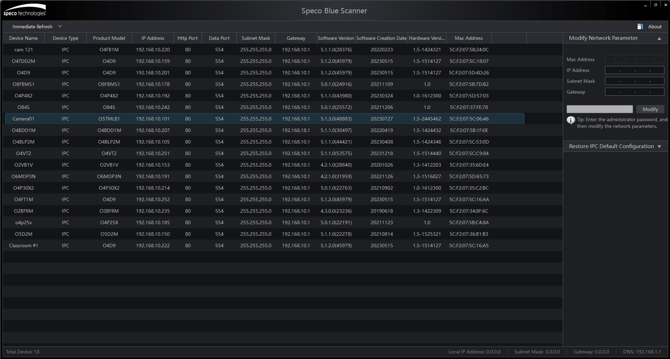
ABOVE is what Speco Blue Scanner will look like.
BELOW is what SecureGuard IP Scanner will look like.

- Regardless of whichever IP Scanner tool is being used, double-click on the camera the needs to be connected to. A web browser should appear and automatically connect to the camera.
- The Login screen of the camera should appear. Please insert the username and password of the camera. Select Login to proceed.

Please refer to Section 2 - Web Access and Login of the camera's user manual for the default username and password.
Initial submission Date: May 1, 2024
Article Authored by: Frank Bondietti