How to configure PTZ Cruise on a Speco Blue Recorder.
This guide will go over how to configure a PTZ Cruise event on a Speco Blue Recorder
Please Note: A Speco Blue PTZ camera is required.
- First, access the Settings menu of the Speco Blue Recorder.

- Once the Settings menu appears, select PTZ under the Camera section. This will automatically open into the Presets page within PTZ settings.

- At the Preset page, towards the right side of the screen, click the drop-down arrow for the camera in question.
- Select Add towards the bottom left of the menu. An Add Preset menu will appear.

- On the Add Preset menu, set a preset number, and give the preset a name.
- It is recommended to leave the preset numbers in numerical order.
- Select OK once set.
- It is recommended to leave the preset numbers in numerical order.

- The created preset should be seen under the selected camera. Verify the preset number is selected for the Preset option on the left side menu.
- Using the directional arrows underneath the cameras image, set the camera in the required position.
- Once set, select Save Position towards the bottom.
- Using the directional arrows underneath the cameras image, set the camera in the required position.
- Multiple presets are required to create a cruise event.
- Select the Add button at the bottom left and repeat the steps above.
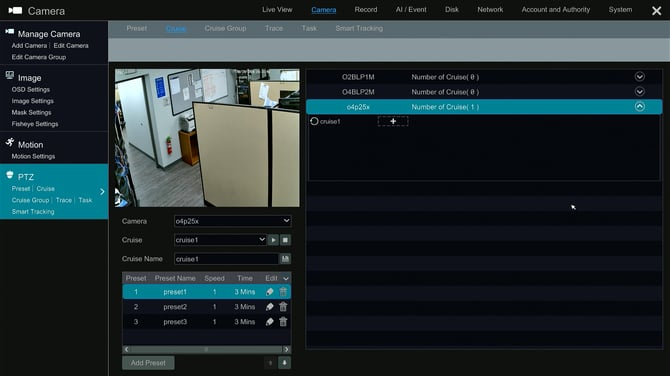
- As seen in the example image below, 3 presets were created for this demo.
- Select the Add button at the bottom left and repeat the steps above.

- Once the required number of presets have been created, select the option for Cruise at the top of the page. This will open the Cruise settings page.
- Click the drop-down arrow on the right for the camera in question.
- Select the Plus + button the appears under the camera name once the drop-down arrow was selected. An Add Cruise menu will appear.
- Click the drop-down arrow on the right for the camera in question.

- On the Add Cruise menu, assign the event a name with the Cruise Name option.
- Select Add Preset towards the bottom left. A different Add Preset menu will appear.

- On the Add Preset menu, select the first preset position for the cruise event from the Preset Name option.
- The Duration option will determine how long the camera sits on the position.
- The Speed option will determine how fast the camera will move from position to position.
- Select OK once set.

- The selected preset will now appear on the Add Cruise page.
- As stated earlier, Multiple presets are required to create a cruise event.
- Select the Add Preset button from the bottom left and repeat the steps above.
- Select Add when done.
- As seen in the example image below, 3 presets are used for this cruise event.
- Select Add when done.

- The created cruise event should appear underneath the selected camera.

To activate the Cruise event...
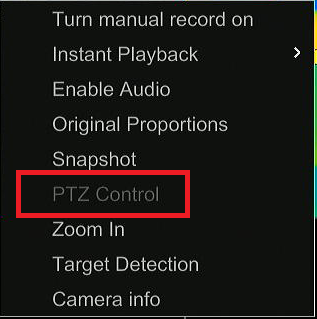
- At the Live camera screen, right click on the camera that a Cruise event was created on.
- From the menu that appears, select PTZ Control.

- A PTZ menu will appear on the right side of the screen.
- Select the Left or Right arrows until Cruise is selected.
- Select the Play button on the cruise event. The Cruise function should activate and cycle through the preset locations at the set time and speed.

- Select the Left or Right arrows until Cruise is selected.
Initial submission Date: June 26, 2024
Article authored by: Frank Bondietti
