
To set a camera's IP address to a static IP address, a computer would need to be able to connect directly to the IP camera. For a Guide on how to do that, CLICK HERE.
METHOD #1: Using an IP Scanner
- Once a connection has been established between a computer and the cameras, please pull up the appropriate IP Scanner tool to scan the cameras on the network.
- Please use the Speco Blue Scanner if you have Speco Blue cameras.
-
- CLICK HERE to be taken to its download page.
-
- Please use the SecureGuard IP Scanner if you do not have Speco Blue cameras.
-
- CLICK HERE to be taken to its download page.
-
- Please use the Speco Blue Scanner if you have Speco Blue cameras.
- Any cameras plugged into the switch that the computer is plugged into should appear on the IP scanner. More may appear depending on how the switch was configured.
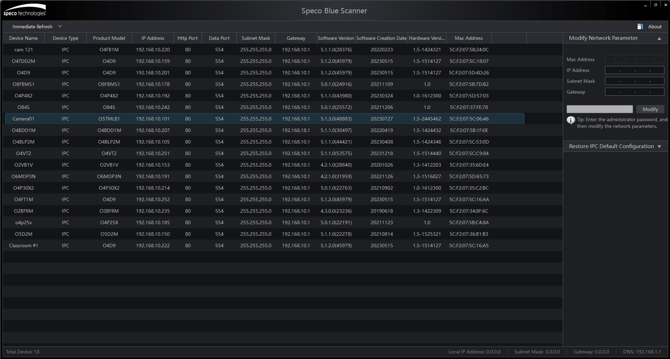
ABOVE is what Speco Blue Scanner will look like.
BELOW is what SecureGuard IP Scanner will look like.

If Speco Blue Scanner is being used...
- Click on a camera from the camera list and its information will appear in the Modify Network Parameter section on the right side of the program.
- The lines for IP Address, Subnet Mask, and Gateway can all be edited. Please make the desired changes.
- Please insert the camera's password in the line at the very bottom, select Modify once all pieces of information are edited/inserted.
- The lines for IP Address, Subnet Mask, and Gateway can all be edited. Please make the desired changes.

Refresh the Speco Blue Scanner by clicking Immediate Refresh in the top left corner. The camera should appear with its newly created IP address. The new address may take up to a minute to appear.
If SecureGuard IP Scanner is being used...
- Right click on the camera that needs its IP address changed.
- On the menu that appears, select IP address and then select Set Static IP Address.
- A new menu will appear.
- The IP Address, Subnet Mask, Gateway and at least DNS 1 will need to be adjusted. Please make the desired changes.
- Select Assign at the bottom of the menu.
- The IP Address, Subnet Mask, Gateway and at least DNS 1 will need to be adjusted. Please make the desired changes.

Refresh the SecureGuard IP Scanner by clicking Refresh in the top left corner. The camera should appear with its newly created IP address. The new address may take up to a minute to appear.
METHOD #2: Connecting directly to the camera.
If the IP address of the camera is known, an IP scanner doesn't have to be used. The next few steps can be skipped.
- Once a connection has been established between a computer and the cameras, please pull up the appropriate IP Scanner tool to scan the cameras on the network.
- Please use the Speco Blue Scanner if you have Speco Blue cameras.
- CLICK HERE to be taken to its download page.
- Please use the SecureGuard IP Scanner if you do not have Speco Blue cameras.
- CLICK HERE to be taken to its download page.
- Please use the Speco Blue Scanner if you have Speco Blue cameras.
*Reference images are in Method #1
- Any cameras plugged into the switch that the computer is plugged into should appear on the IP scanner. More may appear depending on how the switch was configured.
- Regardless of which IP scanner is being used, please double-click on the camera that needs its IP address changed.
- This should pull up a web browser and present the camera's login screen.
If the current IP address is known...
- Open a web browser.
- Our current cameras all support Google Chrome, Microsoft Edge and Mozilla Firefox.
- Not all, but most retired cameras have not been updated to work on current browsers. Camera's manufactured before a certain time will require Internet Explorer to connect.
- Since Internet Explorer has been discontinued, we can only recommend attempting to utilize Internet Explorer Compatibility Mode built within Microsoft Edge.
- For a guide on how to utilize IE mode within Edge, CLICK HERE.
- Since Internet Explorer has been discontinued, we can only recommend attempting to utilize Internet Explorer Compatibility Mode built within Microsoft Edge.
- Not all, but most retired cameras have not been updated to work on current browsers. Camera's manufactured before a certain time will require Internet Explorer to connect.
- Our current cameras all support Google Chrome, Microsoft Edge and Mozilla Firefox.
- Type in the IP address of the camera into the web browser's address bar.
- This should present the camera's login screen.
- Please insert the camera's username and password.
- This should present the camera's login screen.

Please refer to Section 2 - Web Access and Login of the camera's user manual for the default username and password.
- After a successful login, the Live camera screen should be seen.
- If this is the first time the computer in use is connecting to a Speco camera, a page may load before the Live screen that asks the user to download a plugin. Please download the plugin and refresh the page once it completes.
- Different cameras may require different plugins.
- If this is the first time the computer in use is connecting to a Speco camera, a page may load before the Live screen that asks the user to download a plugin. Please download the plugin and refresh the page once it completes.
- At the top-left corner of the Live camera screen, please select the Config option.
- This will open the Basic Information page from the System settings section.

- On the left-side menu, Select Network Setup then TCP/IP.
- Select the option Use the following IP address.
- The IP Address, Subnet Mask, Gateway and at least the Preferred DNS Server will need to be adjusted. Please make the desired changes and select Test to verify that the new address is available.
- Select Save after a successful test.
- The IP Address, Subnet Mask, Gateway and at least the Preferred DNS Server will need to be adjusted. Please make the desired changes and select Test to verify that the new address is available.
- Select the option Use the following IP address.

A message will appear indicating the IP address has changed successfully. The page will then become unresponsive as there is no longer a camera to connect to on the original IP address that was typed into the web browser.
The IP camera's IP address should have successfully changed at this point.
Initial submission Date: May 9, 2024
Article Authored by: Evan Wills