
*** An ethernet cable, as well as a computer with an ethernet port are required ***
- First, verify what the camera needing connecting is plugged into.
- It will either be plugged directly into the recorder unit, directly into the local network, or directly into an external switch. That external switch can then be plugged into either the recorder, or the network. Please verify the setup.
- Plug the computer with the ethernet cable into the same switch that the camera in question is plugged into.
- If the camera is plugged directly into a recorder, plug the computer into an available camera port of the recorder. If the camera is plugged directly into the local network, plug the computer into an available port on the router/modem of the local network. If the camera is plugged into an external switch, plug the computer into an available port on the external switch.
- Please verify the camera's IP address.
- This can be done by utilizing one of our Speco IP Scanner tools. Please pull up the appropriate IP Scanner tool to scan the cameras on the network.
- Please use the Speco Blue Scanner if you have Speco Blue cameras.
- CLICK HERE to be taken to its download page.
- Please user the SecureGuard IP Scanner if you do not have Speco Blue cameras.
- CLICK HERE to be taken to its download page.
- Please use the Speco Blue Scanner if you have Speco Blue cameras.
- Any cameras plugged into the switch that the computer is plugged into should appear on the IP scanner. More may appear depending on how the switch was configured.
- This can be done by utilizing one of our Speco IP Scanner tools. Please pull up the appropriate IP Scanner tool to scan the cameras on the network.
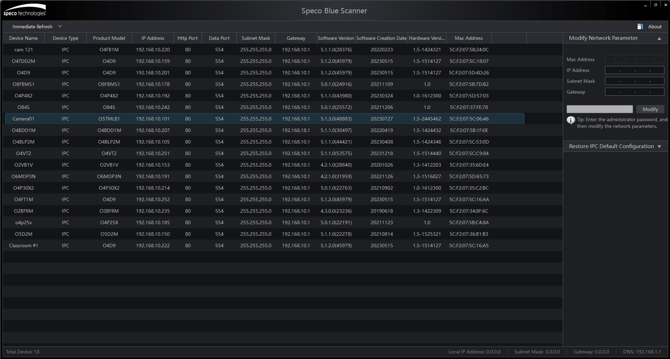
ABOVE is what Speco Blue Scanner will look like.
BELOW is what SecureGuard IP Scanner will look like.

Please take note of the IP scheme of the cameras when using the scanner. Viewing the images above, the IP scheme of the camera's fall under 192.168.10.X. The IP scheme can vary between systems. If the cameras are being set up for the first time, they will more than likely have an IP scheme of 192.168.226.X. Please take note of the IP scheme.
- Now that the computer is detecting the cameras, the computer will need to connect to the cameras. Since there is no DHCP the computer may do one of two things. The computer may remain on its previously learned IP address, or the computer may revert to an IP address inside the range of 169.254.X.X.
- Regardless of what the computer does, towards the bottom right of the Windows Taskbar, right click on the Ethernet symbol and select Open Network & Internet settings.

- The Network Status page will open.
- Scroll down to Advanced network settings and select Change adapter options.

- The Network Connections page will appear.
- Right click the Ethernet option and select Properties. The user may require admin rights to the system to move forward.

- This will open the Properties section for the selected network adapter.
- Please select the option Internet Protocol Version 4 (TCP/IPv4) and choose Properties.

- This will open the Internet Protocol Version 4 (TCP/IPv4) Properties page.
- Please select Use the following IP address:
- For the IP Address - Please match the IP scheme of the cameras that need connecting. The fourth quadrant of the IP address will need to be a unique number 1-255.
- Please review the IP scanner and pick a number 1-255 that is not already occupied by a camera's IP in its fourth quadrant. For example, If the cameras have an IP scheme of 192.168.226.X, the X is the fourth quadrant.
- For the Subnet mask - Please insert 255.255.255.0
- For the Default gateway - Please match the IP scheme of the camera's as mentioned for the IP Address section. The fourth quadrant will be the number 1.
- For the Preferred DNS server - Insert 8.8.8.8
- Select OK at the bottom once all information has been inserted correctly.

The computer should now be set to communicate properly with the cameras.
- Go back to the IP Scanner that was being used. Double Click the camera the needs connecting to. A web browser should appear and automatically connect to the camera.
- The Login screen of the camera should appear. Please insert the username and password of the camera. Select Login to proceed.

Please refer to Section 2 - Web Access and Login of the camera's user manual for the default username and password.
Initial submission Date: May 3, 2024
Article Authored by: Evan Wills